Recipe: Peanut Sauce
Post by Paula Jahn, Co-owner and Registered Dietitian & Cooking Instructor at Nourish Northwest
Peanut sauce is a versatile, balanced sauce that uses many kitchen staples. I love it tossed with warm noodles or rice and lots of sautéed vegetables. It is comfort food at is finest.

It is also a great dip for raw vegetables or chicken satay.
Thin the sauce out with a bit more warm water for a flavorful peanut salad dressing.
One trick our cooking class participants find most amazing is the use of the Microplane grater/zester on frozen ginger. I use the same method on whole garlic cloves to finely “chop” the garlic for sauces and dressings.

The recipe below can be adapted to use almost any unsweetened natural nut or seed butter. Adjust the other ingredients to taste.
Peanut Sauce
Makes about 1 cup of sauce
Ingredients
½ cup natural creamy peanut butter, almond butter, or sunflower seed butter
2-3 Tbs tamari or soy sauce
¼ cup warm water
2 Tbs brown rice vinegar (use unseasoned rice vinegar if you can’t find it)
Juice of ½ lemon or lime (about 2 Tbs)
1 garlic clove, finely grated
3/4 inch fresh ginger, finely grated
2 Tbs brown rice syrup or 1 Tbs honey
½ tsp toasted sesame oil
Dash of fish sauce, optional
1/4 teaspoon red pepper flakes, optional
Preparation
Whisk all ingredients in a medium bowl.
What Is The Deal With Cleanses?
Post by Olivia Martino, Registered Dietitian and Co-Owner, Nourish Northwest
You are probably sick of hearing the words “cleanse” and “detox” in the media. Like many ways of eating, cleanses or detoxes (I will use these words interchangeably) have been popularized by celebrities and big business alike. So what do these words mean? Is it just a trend, or is there actually some value in it?
The main problem with providing a straight answer to this question is that there is no standard definition for a “cleanse.” It can mean anything from a complete fast from food to the other end of the spectrum, which is basically taking a break from unhealthy foods, like the cleanse we host. The basic science behind doing this is to give your body a break from so-called food toxins and help provide your liver with an extra dose of the nutrients it needs to eliminate them from your body. Research has been done to determine whether or not a cleanse is actually effective at improving the efficacy of your liver. Again, the problem is there isn’t a standard diet for what constitutes a cleanse. Research has been mixed, with most of it showing that cleanses do not improve your liver enzymes. However, many popular cleanses that are centered around food deprivation do not provide the body with enough health promoting nutrients, so it would make sense that biomarkers would not improve. Starvation is never a good idea.
Whether or not your liver function actually improves as a result of doing a cleanse, the main reason that we see value in doing one (the right one) is to re-set and improve your eating habits. We look at our cleanse as a period of time that you really focus on your well being by making only healthy choices, cooking all your own food, slowing down, and experiencing mindfulness, rest and relaxation. By making these lifestyle changes, you will often see other side benefits, such as relief from allergies and food sensitivities, clearer skin, enhanced energy and modest weight loss.
So what does our 12 day cleanse look like? We follow a basic elimination and re-introduction plan. The first day we remove sugar, alcohol, refined carbohydrates and some other potential offenders from the diet. We continue to gradually remove food groups until we are in the middle phase of consuming mostly fruits and vegetables with some legumes and nuts. We then slowly re-introduce foods back in and take note of how they effect us.
What sets our cleanse apart from others is that it is intended to promote long lasting change. We approach the meal plan by including recipes we like to eat regularly, with maybe some small modifications that make them more “cleanse-friendly.” The idea is not deprivation, it is nourishment. The point is to reflect on how your body does without certain unhealthy behaviors that you are used to relying on. You may realize that you stop craving sugar, or a small snack of some crunchy chickpeas and a piece of fruit is more than satisfying. You may learn how to successfully meal plan. You may notice some major physical changes, such as those mentioned above.
Everyone has a different experience and whether or not it is a major “a-ha moment” there will be a benefit to doing this cleanse. Maybe it’s gathering a few more healthy recipes for your repertoire. Maybe it’s completing kicking your nightly dessert routine. It’s challenging but always worth it. And speaking of the food, here are some of the delicious things you can expect to eat during the cleanse:


Our next group cleanse starts on November 9th, with a pre-cleanse meeting on November 7th from 1-2. If you would like more information on what this includes and how to register, click here or feel free to email me at olivia@nourishnorthwest.com. We hope you will join us!
Change Your Fitness Routine with the Seasons!
Post by Natalie McClure, Personal Trainer and Fitness Instructor at Nourish Northwest
As temperatures drop and fall is settling in, my workouts change just like my wardrobe. Fall is without a doubt my most favorite season. I love the crisp air, the smell of the leaves as they drop from the trees, and when it comes to my exercise routine, I feel like a superstar when I don’t have to contend with the heat and humidity the summer brings. Besides the standby outdoor workouts–walking, running, biking–there’s a lot you can do to spice up your routine and enjoy the Autumn colors and crisp air, i.e. the following workout I’ve created just for you!
Here are 4 exercises you can do in a park, in your back yard, or on a jogging trail. It will take you about 30 minutes to complete, and with this high intensity training (just like the class I teach on Tuesday nights at 5:45 at Nourish Northwest), that’s all you need to get results! You’ll perform these exercises using the ladder technique. That is, you’ll start with high reps and slowly work your way down to lower reps. In this particular workout, you’ll perform each exercise in a circuit (do each exercise one after the other without rest), starting with 16 reps, and then going down the “ladder” to 14 reps, 12 reps, 10 reps, 8 reps, and ending with 6 reps. Between each circuit, take a 60 second rest to jog in place or march in place. And since you’ll be outside, you can take those 60 seconds to run or speed walk to another spot in the park or down the running trail. Switch up your scenery!
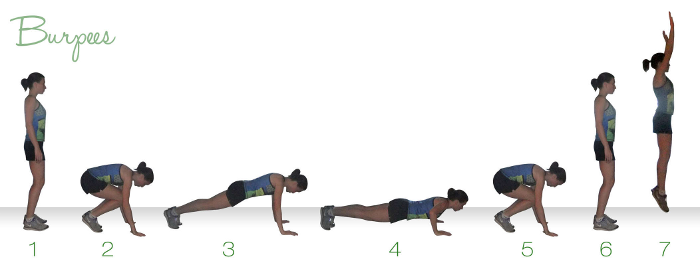
1) Burpees: Start standing with your arms over-head; then put your hands down on the ground to kick your feet back into a push-up position; perform one push-up; jump your feet back into your hands; stand up; repeat.

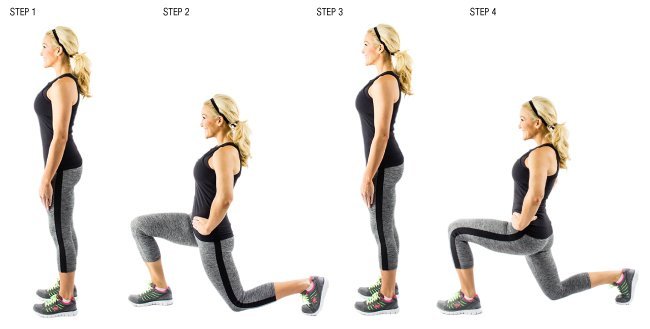
2) Walking Lunges: Sink your weight centrally and make sure that both knees are bent at 90 degrees while walking forward. Watch that your knees don’t jut forward in front of your toes. Walk 16 reps forward and turn around to perform 16 reps back and then go down the ladder with each set.

3) Plank Jacks: While in a push-up position, Jump both feet out wide and then back together where they started in plank position. This is a fast action exercise so try to keep up the pace! To modify this exercise, you can put your hands on a bench and the plank won’t be as difficult to hold. Time yourself in seconds for this one. Start with 40 seconds, and move down the ladder to 30, 25, 20, 15 and then 10 seconds.
4) Walking squats: Step one foot out to the side in a squat and then bring the feet together to move laterally. Stay down in the squat the whole time, and make sure that you’re weight is pushing into your heels, not your toes. Also, make sure you are keeping your feet parallel. If you have a band like the woman pictured here, that will offer you more resistance but it’s not necessary. Walk out 16 times to the left and then 16 times to the right and then down the ladder with each circuit.

You can also move this workout into your apartment/house if you come across a rainy day, but hopefully you’ll get to enjoy this high intensity workout in the beautiful autumn air!
Recipe:Immune Boosting Carrot Soup
Post by Paula Jahn, Co-owner and Registered Dietitian & Cooking Instructor at Nourish Northwest
I cannot believe we have never posted this recipe. It is the single most frequently made soup of Nourish Northwest. I estimate we have made at least 100 batches of this delicious soup. We make it for health fairs, immunity cooking classes, and for ourselves to keep healthy through the cold and flu season. It is the soup that embodies the nutritional philosophy that Olivia and I share: Its ingredients are vegetable-based, whole, nutritious, and a pleasure to eat.
Although the warm weather has tricked us into thinking we live in an endless summer, virus season is upon us. Olivia and I have both battled a bug this fall. Along with our elderberry syrup, this soup is a fighter. Below is a breakdown of the ingredients and their immune-boosting properties.
IMMUNE BOOSTING NUTRIENTS

Carrots: Carrots are an excellent source of the antioxidant, beta-carotene, which boosts the immune system’s production of infection-fighting T cells.
Chicken Broth: Chicken broth has been shown to inhibit the release of white blood cells that produce mucous. Warm broth is also very soothing to the throat.
Cayenne – Anti-inflammatory
Citrus: Citrus juices are very good sources of vitamin C. Vitamin C is associated with reducing the length of time and severity of symptoms associated with upper respiratory viral infections. Vitamin C also provides antioxidant activity to support healing.
Coconut- Anti-Bacterial
Ginger: Ginger is a potent anti-inflammatory. It also helps to relieve nausea and vomiting.
Garlic: Garlic contains allicin, a powerful compound that helps the body prevent and fight infection. Allicin is activated when the garlic is crushed or chopped.
Tomatoes: Tomatoes are high in lycopene and beta-carotene, both of which are believed to stimulate the immune system.
Recipe:

IMMUNE-BOOSTING CARROT GINGER SOUP
Makes 10 servings
Serving size: 1 cup
INGREDIENTS
1 medium onion, cut into 1-inch pieces (2 cups)
2 Tbs olive oil
1 tsp salt
4 each celery stalks, cut into 1-inch pieces (2 cups)
6 carrots, cut into 1-inch pieces (4 cups)
2 small sweet potatoes, cut into 1-inch pieces (2 cups)
1 cup tomatoes, cut into 1-inch pieces
1⁄4 cup ginger, grated
2 Tbs garlic, minced
Pinch cayenne
3 cup chicken or vegetable stock
1 can coconut milk (14-oz)
Lime juice, to taste
Salt, to taste
Finish with cashew cream or plain yogurt
PROCEDURE
- Sauté onion in olive oil in a stock pot until translucent, about 5 minutes. Stir in 1 tsp salt.
- Add celery, carrots, sweet potatoes and tomatoes and sauté another 5 minutes.
- Add ginger, garlic, cayenne, stock, and coconut milk, and bring to a boil. Reduce heat and simmer, covered, until vegetables are very soft, about 30 minutes.
- Purée soup with an immersion blender or in a blender.
- Add lime juice, pepper, and salt, to taste.
- Garnish with cilantro or parsley.
Boost Your Immunity with this Homemade Elderberry Syrup
Post by Olivia Martino, Registered Dietitian and Co-Owner, Nourish Northwest
It’s happening already, all around us people are getting sick. Even both Paula and I have been feeling something coming on so we rushed down to the Herb Shoppe to buy some elderberries. Last year, elderberry syrup saved us both from catching everything that was going around. This year, we realized that in order not to break the bank we should start making it on our own. This turned out to be the simplest process, which resulted in a large amount of delicious tasting elderberry syrup.
Also known as Sambucus nigra, elderberries are known for their high antioxidant content and have been used for centuries to boost immunity, help relieve coughs, colds, bacterial and viral infections. They are high in Vitamin A and C and quercitin, which is a flavanoid that is believed to be the therapeutic bioactive compound.
Dried elderberries are available in bulk at specialty health food stores/herb shops or can be purchased from a variety of sources online. Based on personal experience, I highly recommend always having a jar of elderberry syrup in your fridge during the cold and flu season. It’s a true miracle worker!
- ⅔ cup black elderberries
- 3½ cups of water
- 2 Tablespoons fresh grated ginger
- 1 teaspoon cinnamon
- ½ teaspoon cloves or clove powder
- 1 cup raw honey
- Pour water into medium saucepan and add elderberries, ginger, cinnamon and cloves (do not add honey!)
- Bring to a boil and then cover and reduce to a simmer for about 45 minutes to an hour until the liquid has reduced by almost half. At that point, remove from heat and let cool enough to be handled. Pour through a strainer into a glass jar or bowl.
- Discard the elderberries and let the liquid cool to lukewarm. When it is no longer hot, add 1 cup of honey and stir well.
- When honey is well mixed into the elderberry mixture, pour the syrup into a pint sized mason jar or 16 ounce glass bottle of some kind.
- Store in the fridge and take daily for its immune boosting properties.
- Standard dose is ½ tsp to 1 tsp for kids and ½ Tbsp to 1 Tbsp for adults. If the flu does strike, take the normal dose every 2-3 hours instead of once a day until symptoms disappear.


